Unlucky 13!!
I realize it might have been 3 weeks since I last posted? I looked at the 21st and must have seen the 28th last week - I promise it’s not normal for me! Maybe it’s the sense of making the 13th blog post. Who knows?
Anywho, I have a few updates, and this post is mostly going to be about the ship generation scripts I have set up. I have also realized I desperately need a product manager telling me what to do. It’s so helpful at work. Please let me know if you’d want to volunteer ;-;
Ship Generation
If you remember, a major part of what I wanted for the ship management game was variety, and a good way to introduce that was through randomness on generation. AKA a random ship layout each time.
The way that I approached this was making room prefabs that were static each time, just with a plan to be randomly placed on start up. There’s rooms for each module as well as empty rooms that can be used for upgrades later - but the main thing is that orientation of the modules (or, more specifically, the exits) matters, as we’re going to be using those exits to connect with other modules later.
Since I haven’t actually set up each module, the prefabs arent too interesting. They just fill out what connections the module has as well, the locations of those connections, the allowed orientations of the module, and in what part of the ship the module should be placed. This only really matters for weapons and the engine, as they need to be placed on the edges for logistical reasons.
Room Placement!
Now, the obvious first step of this algorithm is to place the modules.
This is easier said than done - it’d be very easy if we didn’t have to care about orientation! However, we don’t want instances like a weapon module’s exit being on the border of the ship, causing impossible access to said module.
To faciliate module placement, we keep a dictionary of Vector2Int and the aforementioned module. We also set up a seeded random variable, so people can have consistent generation if they want to replay a map. (In fact, all the RNG currently runs off of this seed, which also can be random if the players so choose so).
We also have a list of the modules we want to place. You’ll note that these two do not have the same types! This is because Modules care about orientation (E.g their orientation is already chosen) while ModuelInformation just has the information you want on how to place each module. Since modules really dont need that information past generation, they’re seperated.

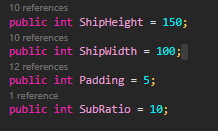
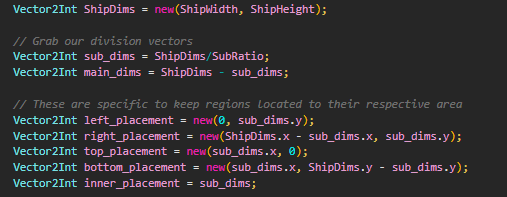
Next, the ship height, width, room padding, and sub ratio are all only used here. Height, width, and padding are pretty self-explanatory, but the sub ratio refers to how the ship sections are split up.
In order to place modules on edges correctly (and on the correct edge) and not have any modules not placed where they should be, we split the ship up into something that looks like this:
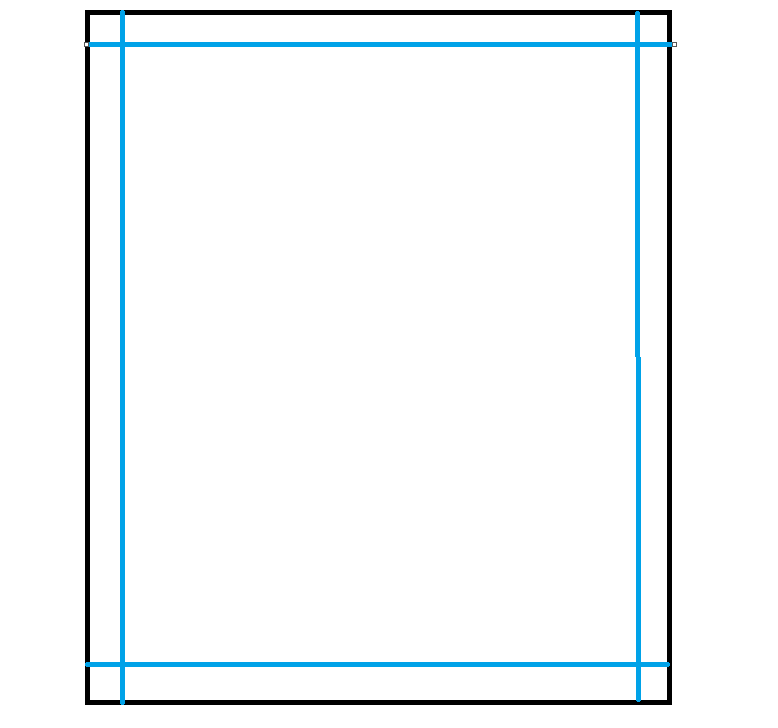
The sub ratio is just what the width or height is divided by in order to determine the size of the smaller respective edge. You can see that calculation here!
Now, we’re going to start trying to place modules. For an easier sense of understanding, we put the aforementioned PlacingModules list into a queue, which is going to be the main thing we iterate through.
Iterating Through the Queue
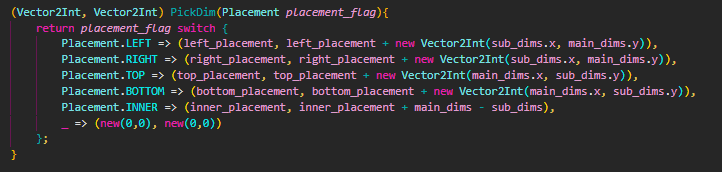
The first thing we want to do is choose the placement location we’re going to place the module at. This is not random, and essentially just goes through where we can place the module in bit-degree order. This means that each subsequent module (if it is placing multiple of the same module) will be in a different, but valid, placement slot. From that placement flag, we choose we bounds we’re working with - which you can see being done here:
Great! We have the bounds and everything we need in order to place the module. Now, we’re just going to choose random locations in the bounds and make sure that it does not intersect with existing rooms (while considering padding) and that the orientation is correct. We’re going to attempt this like 10k times, and if we can’t place a room in that amount of attempts, we’re going to fail. Failing, for now, just yells at me in the Unity editor, but in game it’ll probably just move to the next seed and restart.
Now, once our random placement correctly identifies a good location to place the room, it returns both the chosen orientation and upper-left corner location.
Yes, it is upper left corner because I got used to Monogame coordinates. I did not feel like changing my thinking for Unity. Unity will live with it!
Placing the Module
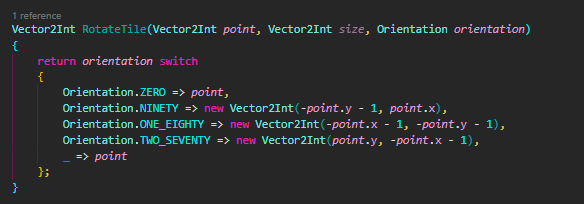
This should be really easy right? Well, it is, if the orientation is the same. If it’s not, we need to rotate not only the connect, but each tile on the tilemap.
An additional thing to note is that we have a single greater tilemap that the module puts itself onto. Modules have game objects that correspond to their functionality and a tilemap that corresponds to their display. While the functionality part remains, the module places the tiles in its tilemap onto the main tilemap. This allows us not to have a bajillion tilemaps that have no way of knowing of each others existence, which will be needed in our later steps!
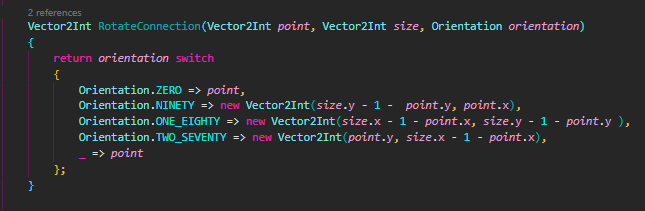
So, we basically just have to rotate and place the connection and tiles correctly. We can rotate each tile with this helpful function:
Which is a slightly edited version of this function which operates on connections:
Once we have that, we can move on to the next module. And now we can work on connecting them!
Setting Up Ship Map
So - actually - I lied. There is still a step we have to do before starting the connection logic. It actually isn’t too complicated!
The connection logic works through a modified version of A. In order for this A to work, we need a grid of nodes that have information. Rooms are part of that information, as well as their padded areas. So, we just need to initialize the rooms and set that up before moving into the connection logic.
This is really simple, but also looks really complicated because I did not name my variables nicely (bad Noellva!).
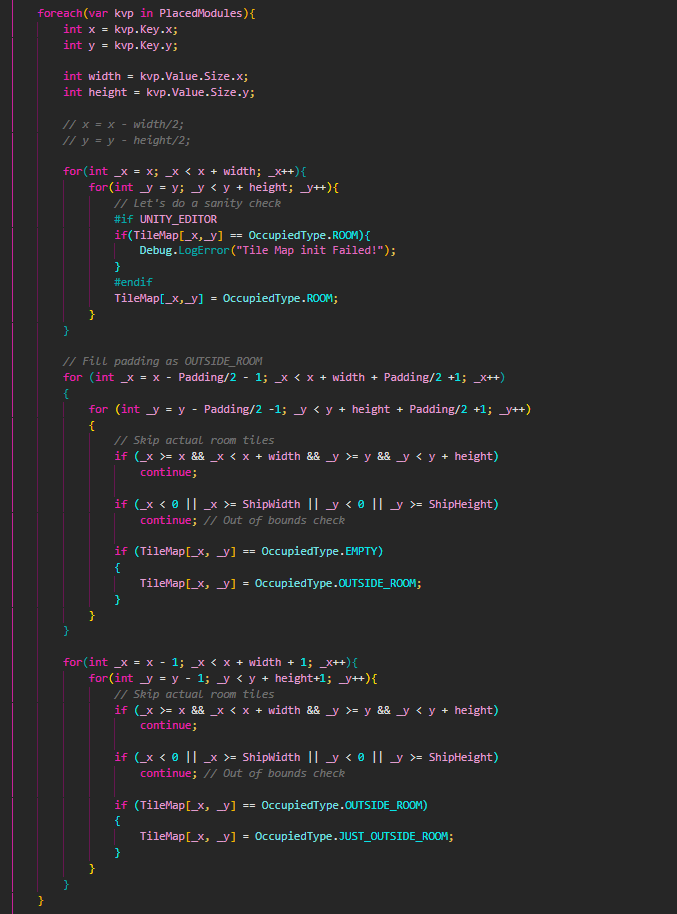
The outside room and just outside room enums may seem pointless, but I’ll explain why we differentiat that in a moment.
Connections
Now, this was by far the most difficult part of getting this to work. In fact, it took most of the time to figure this out.
Determining Connections
I looked up a bunch of way to do connection logic, but most of them were not what I was going for! There was random walk, sure, but I didn’t want a bunch of zig zags that made the connection an insane thing to traverse through while just being frustrating for generation. Then I couldn’t just connect random modules together - I had to do a sideways method of connecting the two closest together. Although, that isn’t always good, because you can have a situation like this:
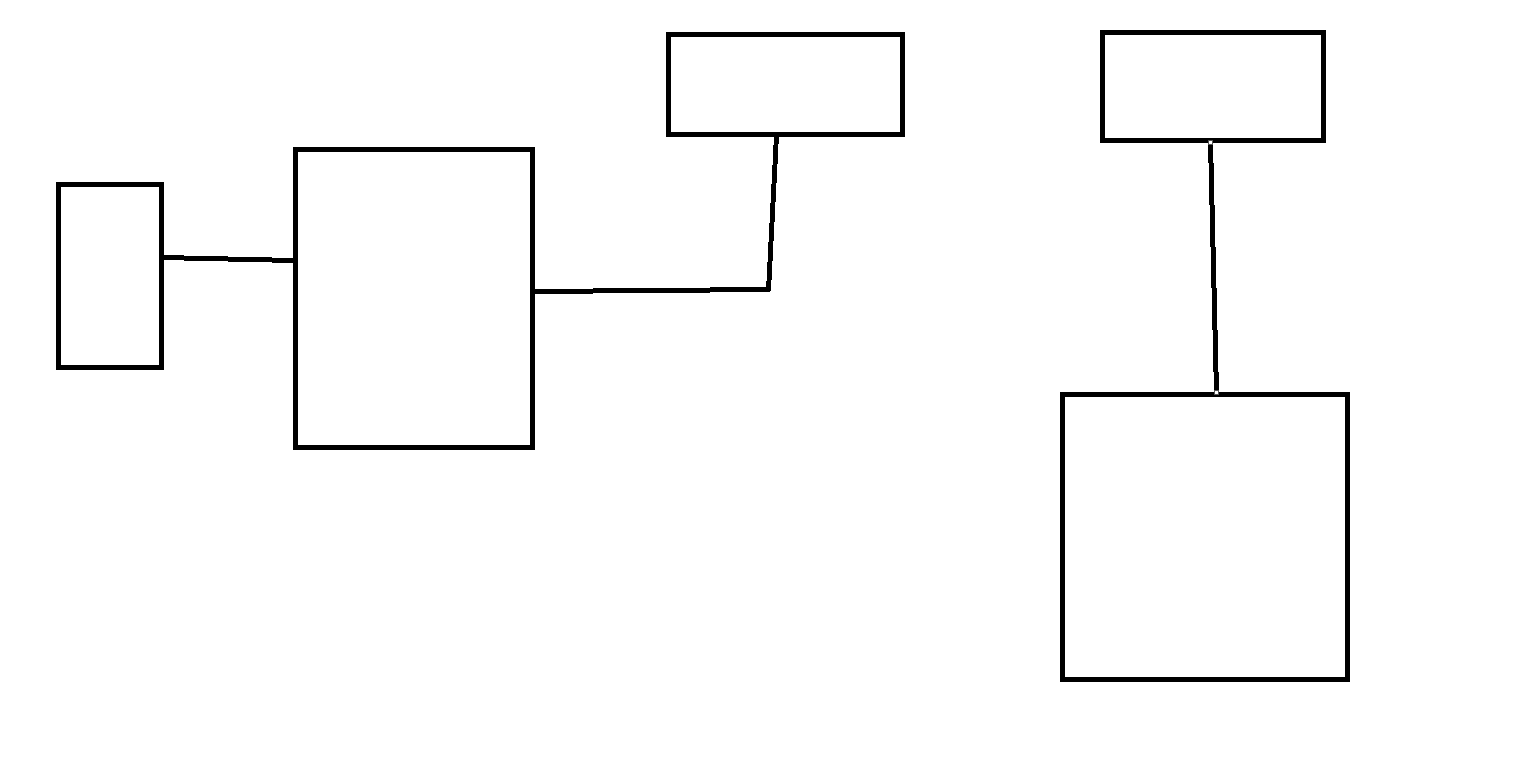
When, instead, a correct connection would be as so:
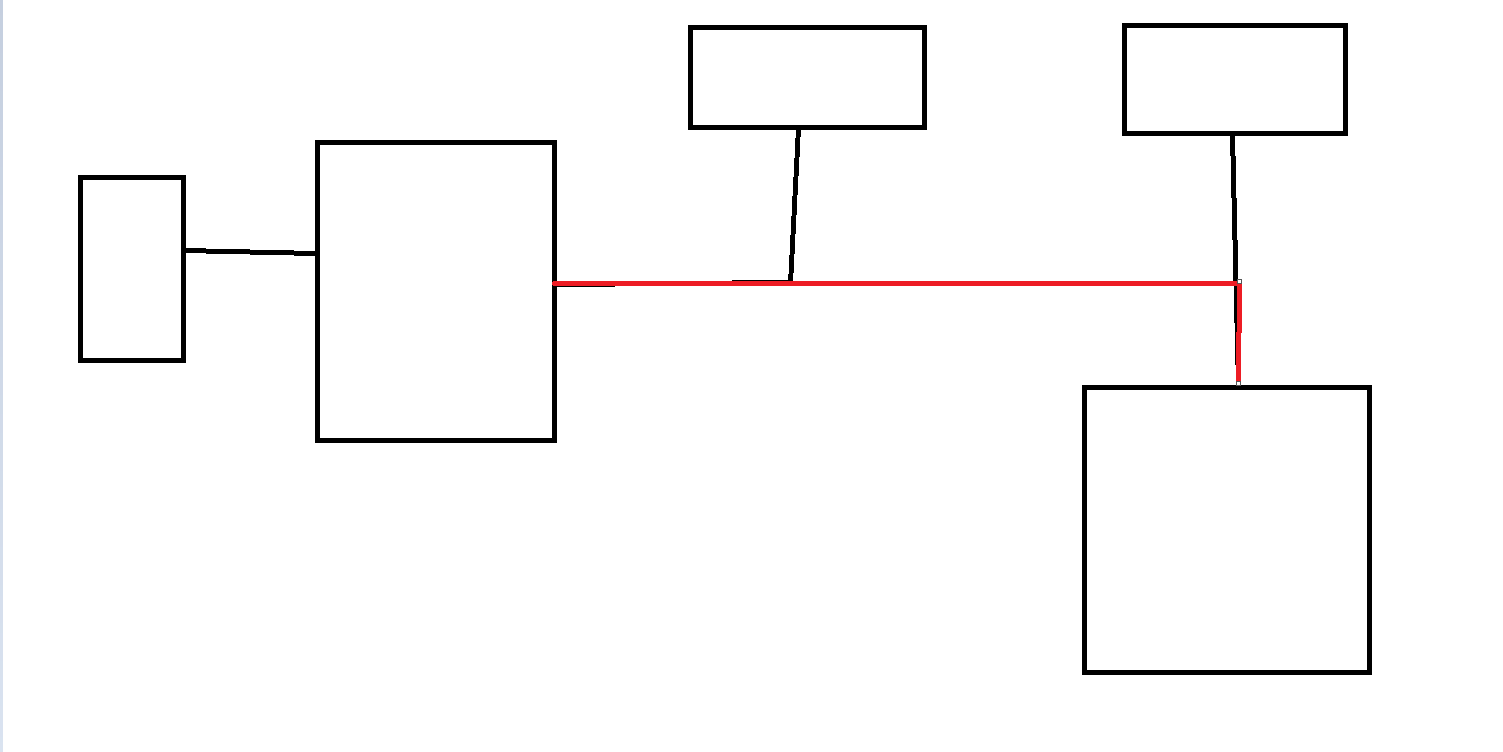
E.g. instead of the main room connecting with the outer one first, it connects with the other main room which allows the outer two to merge their hallways together.
This made me go for a weight-based approached. A room’s weight is determined by their size, with higher weights being connected first before smaller ones are. Additionally, each module can only connect to another module once - as well as the amount of connections a node is supporting decreasing the chance it will be chosen for another.
In short, the order logic looks like so:
Ignoring the presence of magic numbers (which is just the weights), this works pretty well and sets up the connection logic to be pretty nifty.
Connecting With Hallways!
I swear, getting the previous part right is much harder than this part.
This operates as an A* algorithm, in where a few things need to be considered. First, if we interact with an already connected hallway, we can encourage traversal of said hallway to our goal. This makes hallways more connected and potentially helps avoid the issue of frustrating hallways.
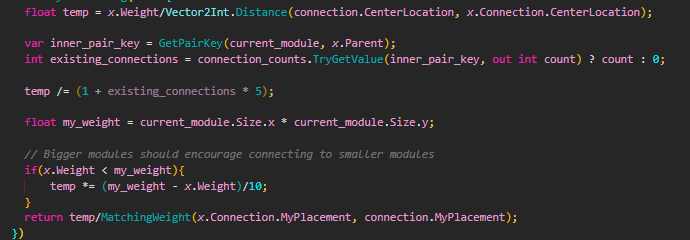
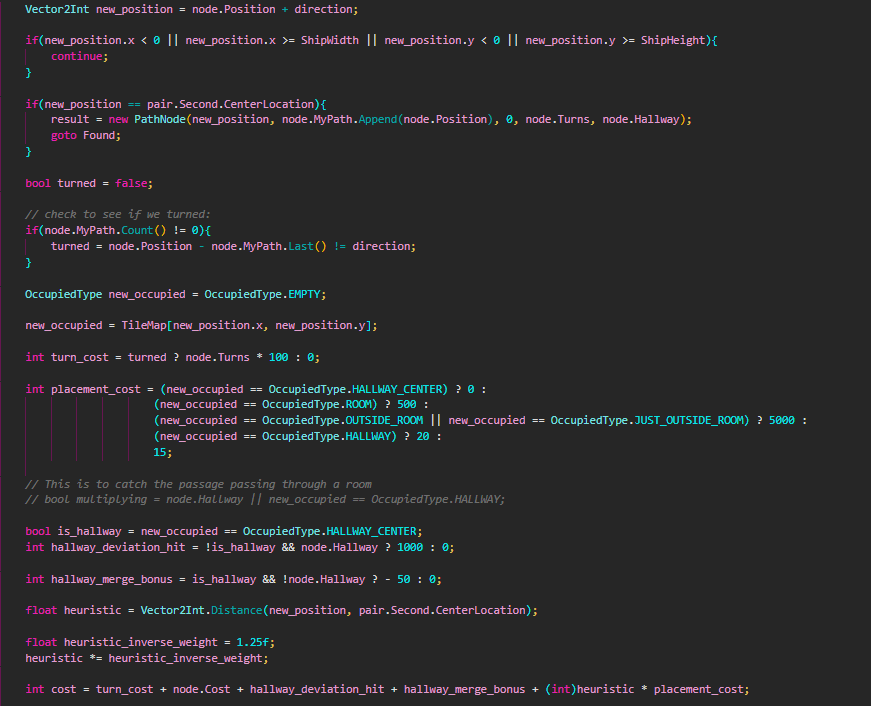
Now, we can see how this cost function for our A* operates (I’ve swapped out all the weight names with the actual values so you can see them):
You’ll notice that we’re actually using labels! Such a rare phenemon in coding. I think this is the only time I have actually ever used them outside of assembly.
Once we set up the hallway path, we update the placement map in order to inform subsequent placements where our hallways are.
Now, the just outside of room tag prevents the very annoying situation where hallways and mainly vents were just coasting along the edge of the room because they hated me. This effectively created more space inside said room which I didn’t want, so I introduced that to prevent it :3
Now, vents are super similar, and can be seen here:
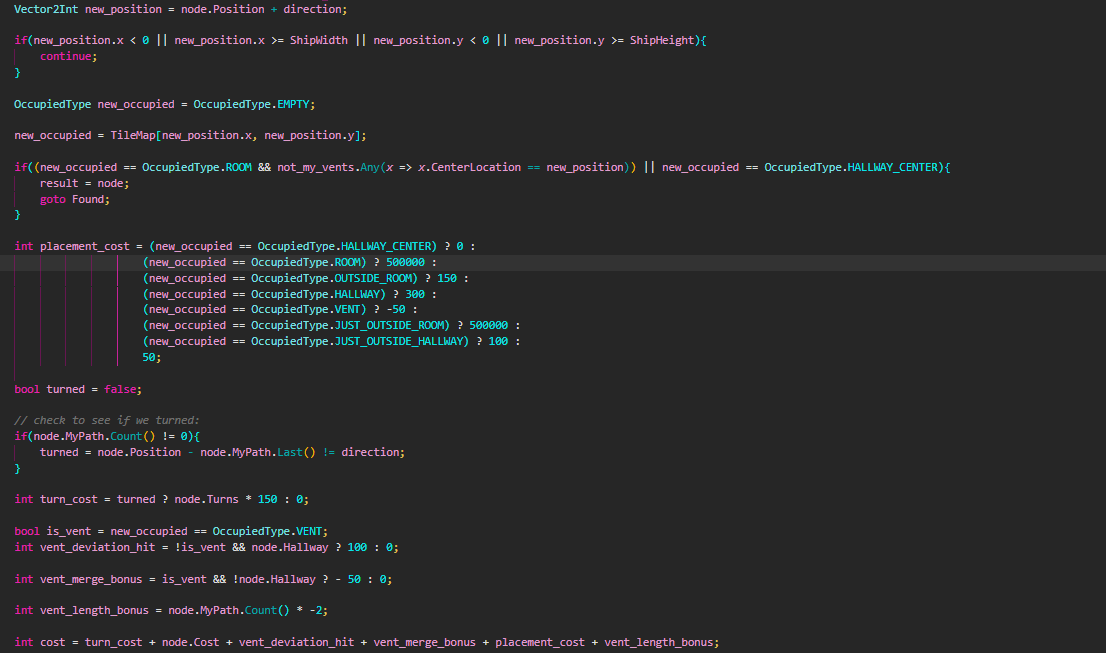
Note that hallways don’t consider vents, as they are placed before them and therefore vents cannot exist. Additionally you’ll notice that vents will stop when connected to a hallway center. This is because vents choose rooms to connect to, so when they connect to a hallway (since the hallways are going to be entirely connected), they technically have connected to said room.
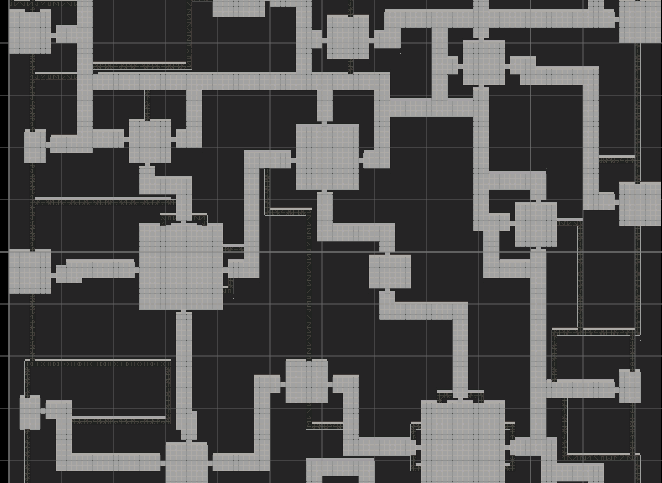
Placing Tiles
Thought we were done? Well me too! Guess we cant all have nice things!
Determing what tile to place, I thought, was a pain in the ass.
The way this works is that we use a bitmask and then set that bitmask depending on what tile surrounds it. You can see that logic here:
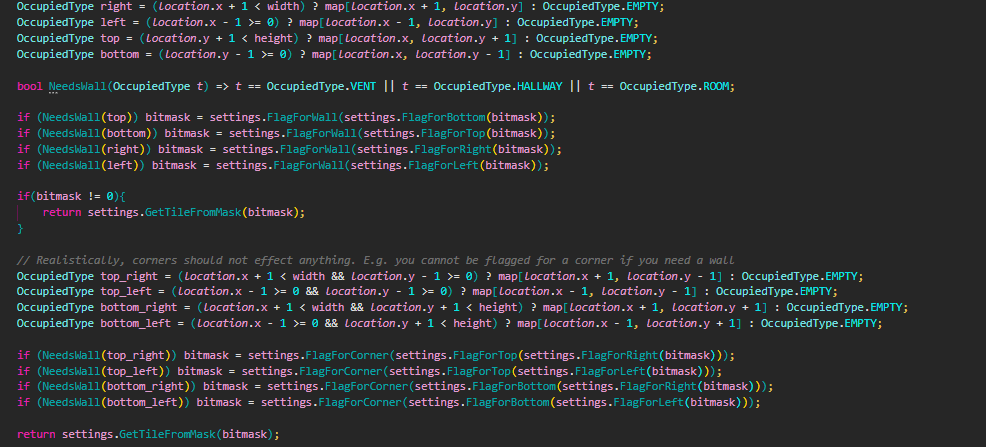
How annoying! It doesn’t even work right! (To clarify, it does, I just didn’t create every tile :3)
Other Things
Wowzers! That was a lot of information that I dumped on you! Sorry!
Anywho, I met up with an old high-school friend I havent talked to in ages a few weeks ago. He is a music composer and was really eager to get into games. I had this puzzle game idea that I’ve wanted to create for a while, but I’m musically inept (why does a puzzle game need a good composer? Why such an eager question!)
I’m hoping he is open to working on it, since the onus would be on him. He definitely wants to help out though - so I’m optimistic! I’ll give updates if that goes through.
Thanks so much!!